For additional support,
create a ticket
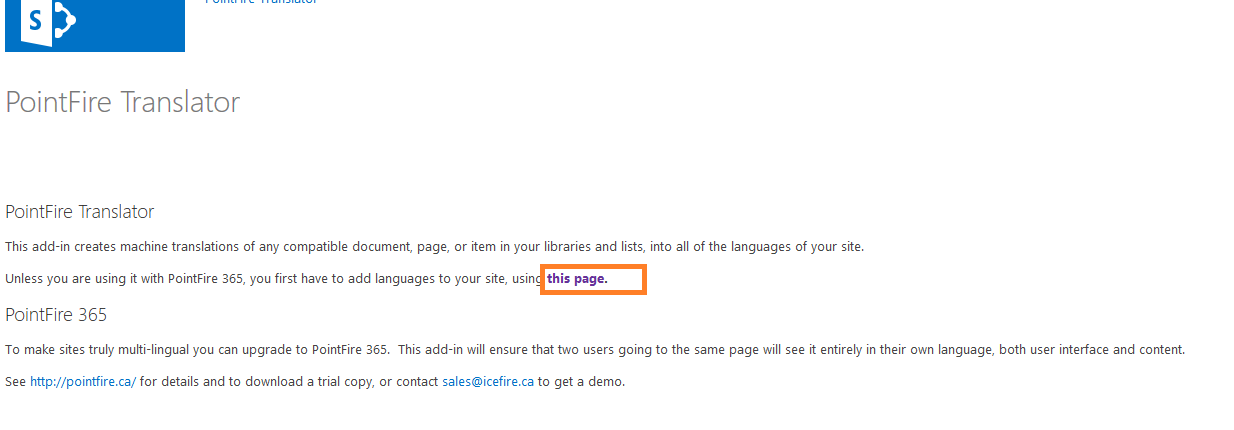
This add-in creates machine translations of any compatible document, page, or item in your libraries and lists, into all of the languages of
your site.
It will work either alone, in which case it will use the Azure Translations
Text service, or use PointFire Translator Server if it is installed and configured.
For better quality translations of a wider range of document and page types, see PointFire Translator Server
PointFire Translator will not only translate the document, it will
also translate the document title, and all text metadata columns.
For list items, it will translate all the text columns.
PointFire Translator is compatible with PointFire 365 and with the SharePoint
Multilingual Page Publishing feature. If you
are using PointFire 365, the lists and libraries that have been made
multilingual will also be multilingual for the purpose of PointFire
365. In that case, when you go back to the site you will only see
documents or items in your own language, you will not see the
translated documents or items unless you change your language or turn
off filtering. In the case of pages in a page library, if you
follow a link to a page that is not in your language and a page in your
language exists, you will see the page in your own language instead.
Translation
After installing, go to the default app page, which should be called "PointFire Translator" in the navigation.
Select "this page" link to navigate to your site’s language setting and add the languages that you want. You must be signed in as a site owner or site collection administrator to choose language settings for a site.
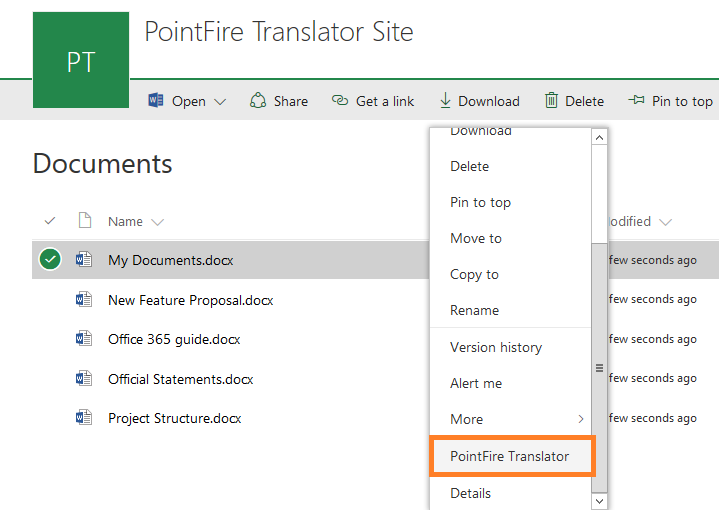
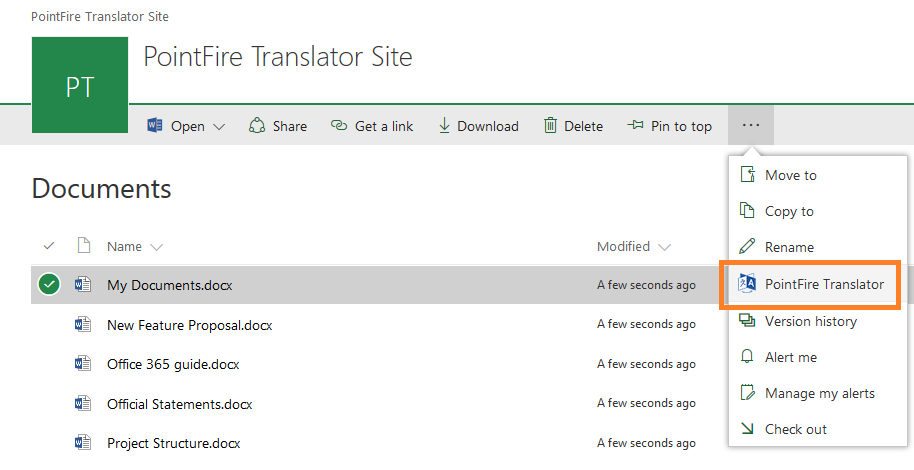
Now navigate to the document library that you want to translate.
Whether it's using Modern or Classic experience, you can see the
"PointFire Translator" menu item and also in the ribbon menu. This
works for libraries and for lists.
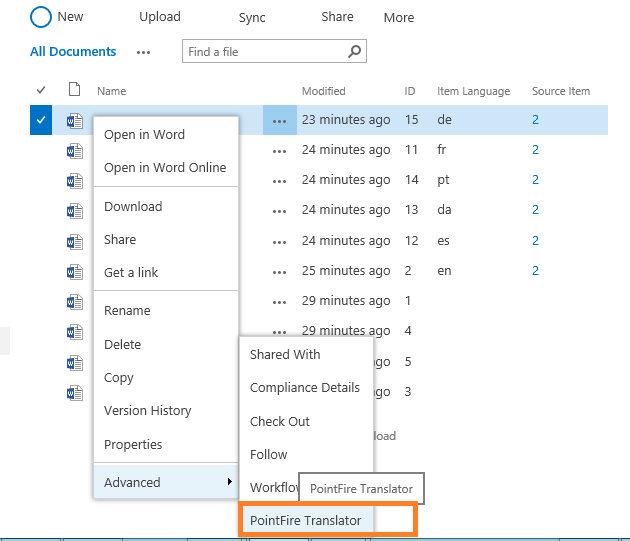
And if you have set classic view for your list you can see the following entries on your site.
Now select on the document that you want to translate and click on
"PointFire Translator". The translator page will open if you are using
modern libraries or it will open as a modal popup.
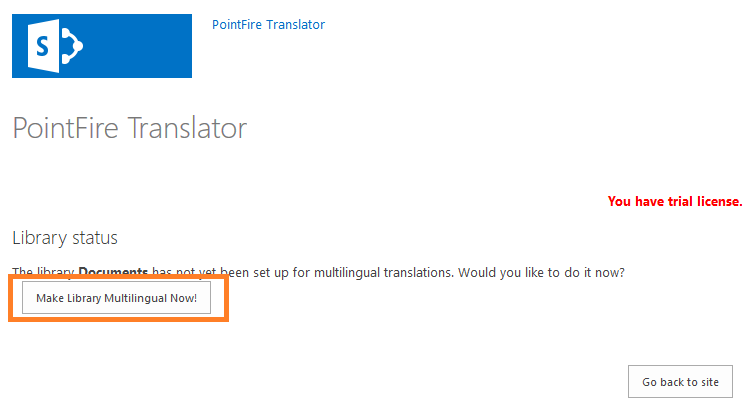
If your library is not
multilingual then click on the button "Make Library Multilingual Now!"
to make your list or library multilingual. A multilingual
list or library is one that has two extra metadata columns: "Item Language" and
"Source Item". Item Language will have a list of possible values
that is taken from the list of alternate languages of the site.
And if your list is already multilingual it will show you the following
options. Select the language of the item, which will set the Item
Language of the selected item. In this case English is selected.
The document will be translated into all the other languages of the
site. If the item has already been translated into some languages, it
will not be translated again unless that translation is deleted.
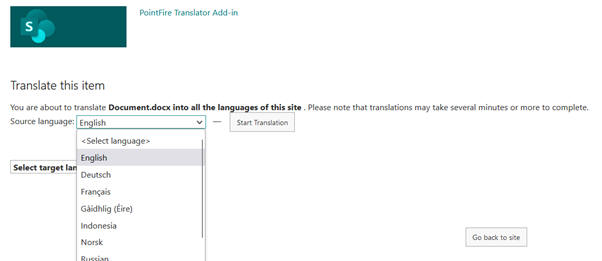
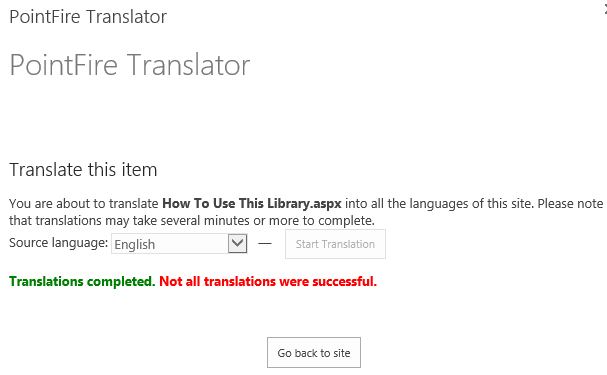
After selecting the language now click on the "Start Translation"
button to start the translation and you can see the following message
on your page.
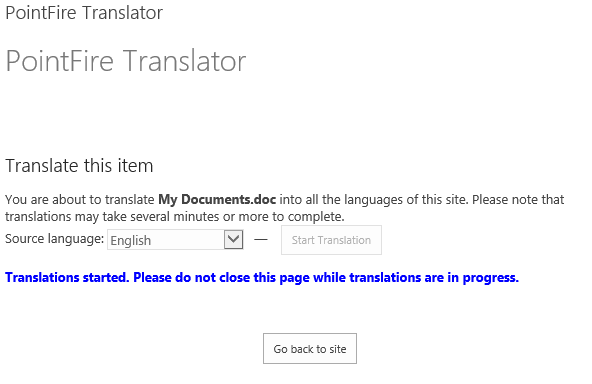
Note:- Do not close this page or refresh while translation are in progress.
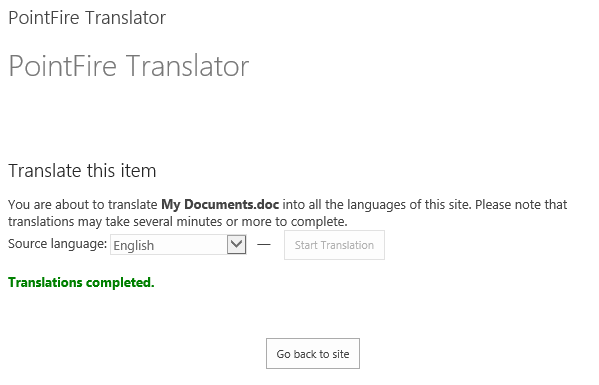
After completion of translation you can see the following message on
your page and now yo can go back to your document to see all the
translation by simply clicking on the "Go back to site" button.
And if translation job fails for any cause the following message will appear on your page.
You can also see whether it has used the Machine Translation Service or PointFire Power Translator.
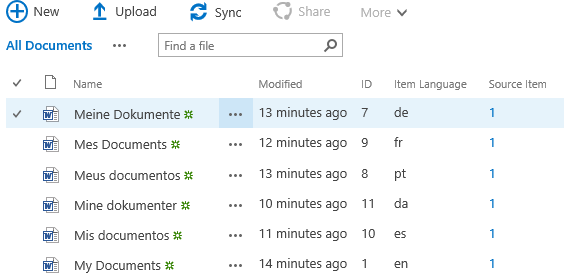
And now go back to your list to see the results. PointFire Translator
will add all the translation of your document to your document library
as below:-
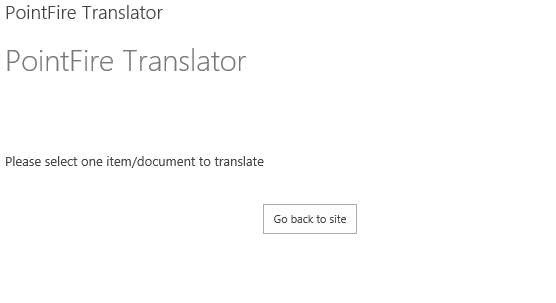
If you select on “PointFire Translator” without selecting an item you will get this following message.
You can not select two items at a single time for translation. If you
will select then you will see the following message on translation
page.
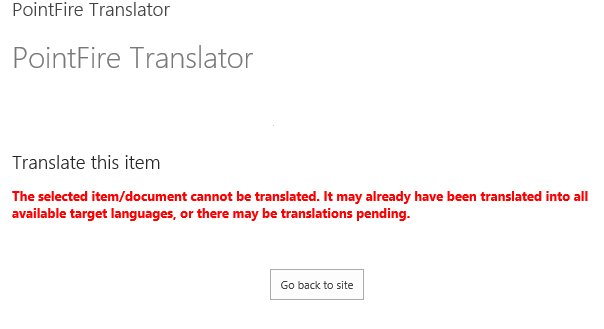
If you select a document/item that has already been translated into all
the site language then you will get following message when you select
on the "Start Translation" button.
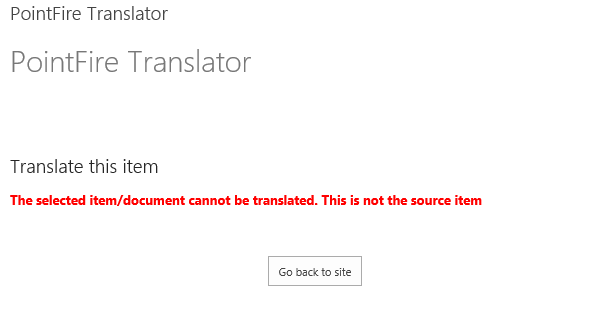
And if you try to translate a document that is a translation of another
document, not the original, then you will get following message on your
screen.
Installation
In the app page, you can see two options “PointFire
Translator Server configuration settings” and “Azure
Document Translator configuration settings”. If you want to use
this add-in without the PointFire Translator Server, you need to first
configure the “Azure Document Translator configuration settings”.
This consists of several tasks:
A) Create an Azure Storage
Account
B) Create "source" Container and generate SAS tokens
C)
Create "target" Container and generate SAS tokens
D) Get the Azure
Storage Blob Service endpoint
E) Add required values in the Resource
sharing (CORS)
F) Get the value of Azure Translator key and Azure
Translator Document Translation endpoint.
G) Configure setting in the
PoinFire Translator Add-in page.
A) Create Azure Storage accounts:
Step 1:
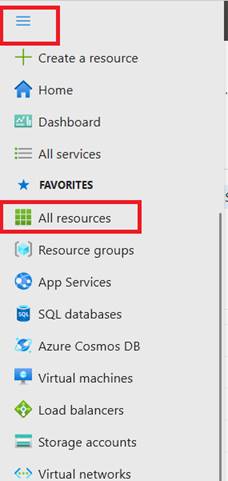
Go to “https://portal.azure.com”
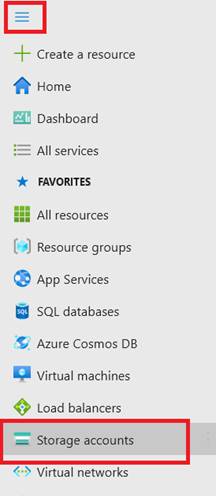
Step 2:
In Azure portal
Home
page, click on the menu option and click on “Storage
accounts”.
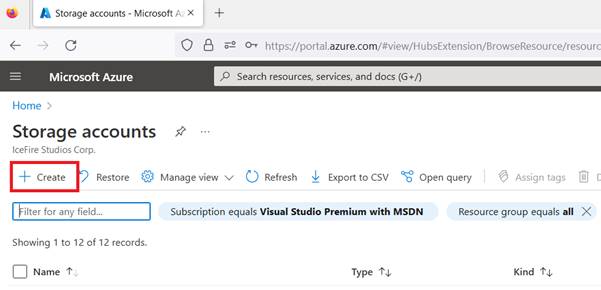
Step 3:
Then
click on
Create.
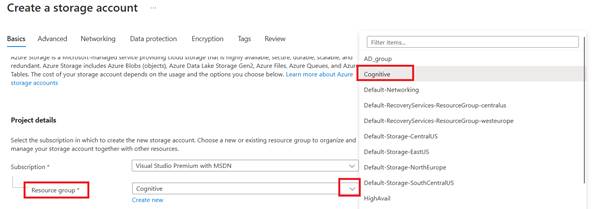
Step 4
To
Create a Storage account,
you need to fill all the required information.
Under Project details,
select the
Resource group
value as an existing or new group. In this case, we are using "Cognitive",
the same group as the Translator API instance, but that is not
mandatory.
.
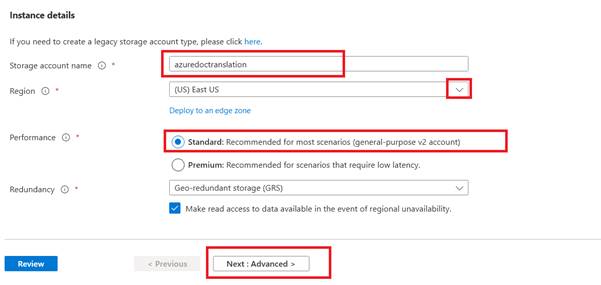
Step 5:
Enter the
Storage account name
and
Region.
Then click on
Next: Advanced >
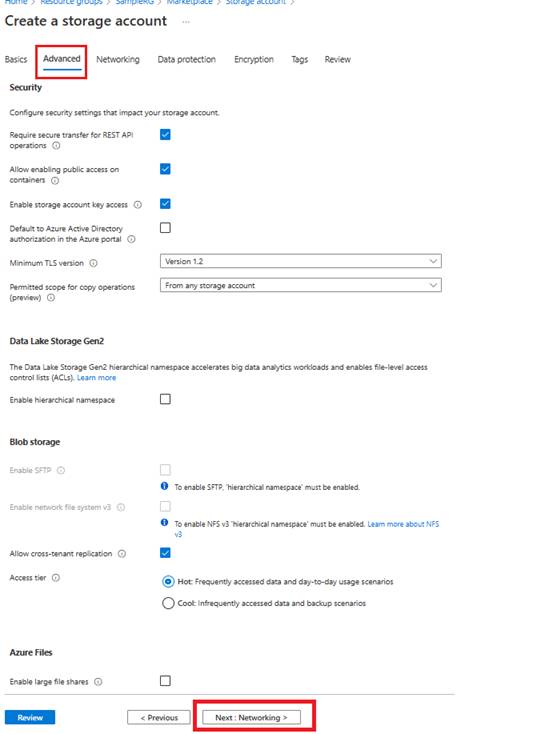
Step 6:
Under
Advanced
tab,
please check all the values as shown in the image below and then
click on
Next: Networking>.
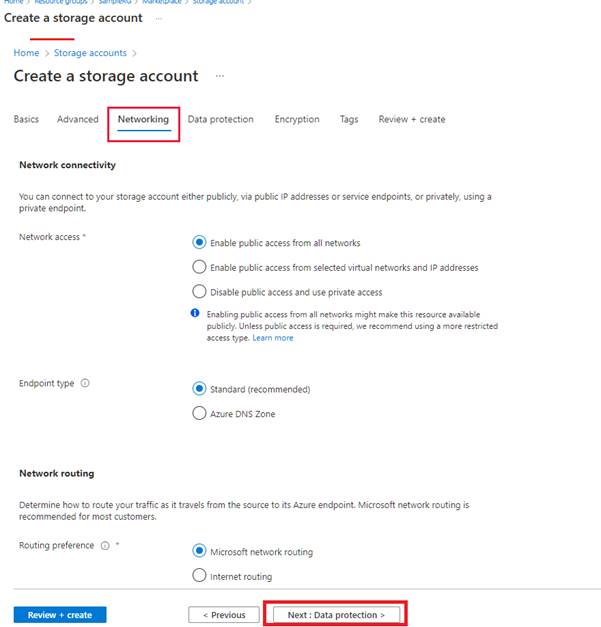
Step 7:
Under
Networking
tab, the values must same as shown in the image below and then click on
Next: Data protection >.
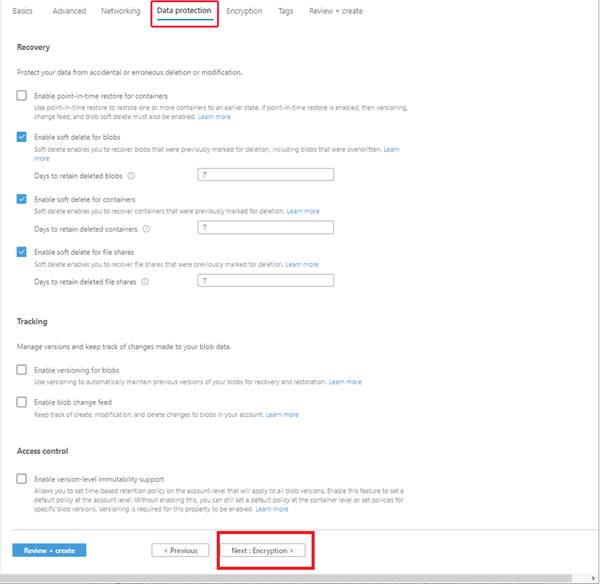
Step 8:
Under
Data protection
tab, the values must same as shown in the image below and then click on
Next: Encryption >.
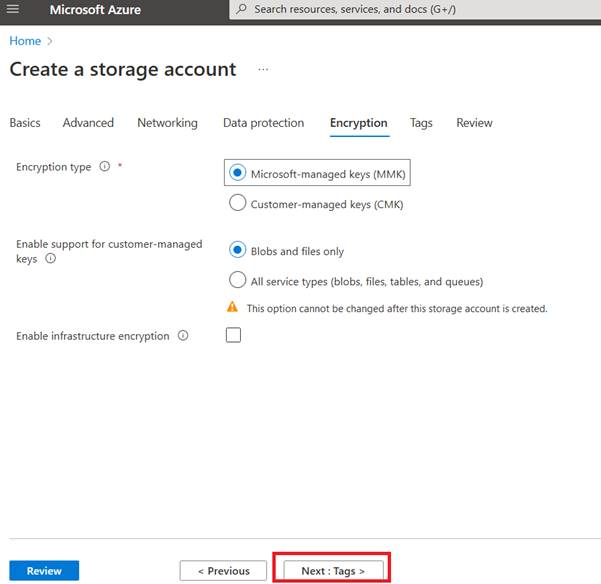
Step 9:
Under
Encryption
tab, check the values and click on
Next: Tags >.
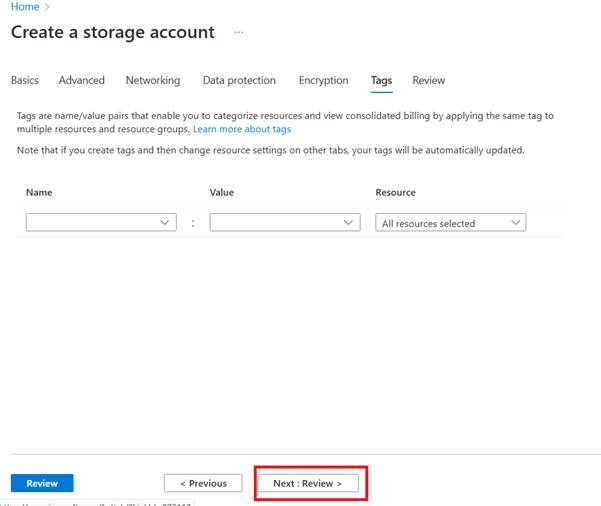
Step 10:
Under
Tags
tab click on
Next: Review > and
then
wait for some time.
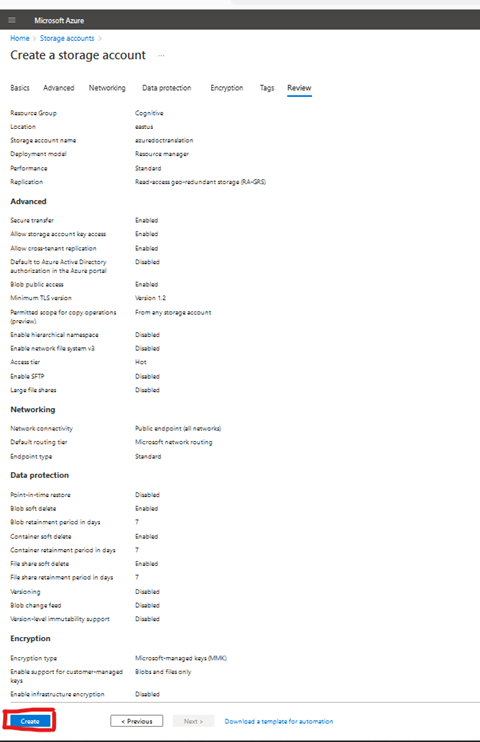
Step 11:
Then
Click on
Create.
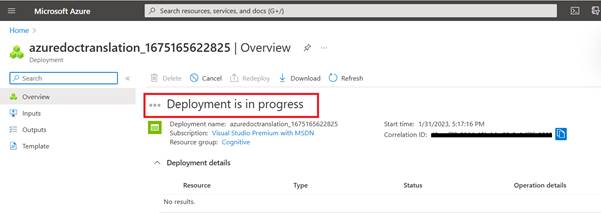
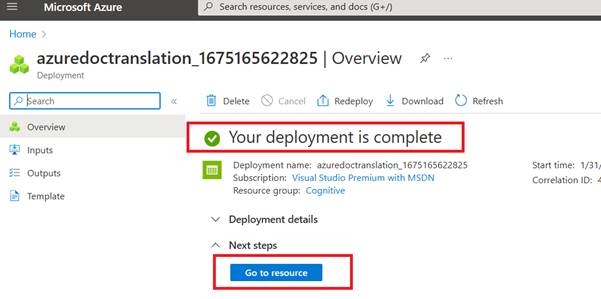
Step 12:
After clicking on
Create
wait for some time when the
Deployment is in progress.
Step 13:
After successful deployment, it will show a complete message as shown in
the below image.
B) Create source Container and generate SAS token:
We need to create two containers
“source” and “target”.
Please follow the below steps to create the
Containers
in
storage account.
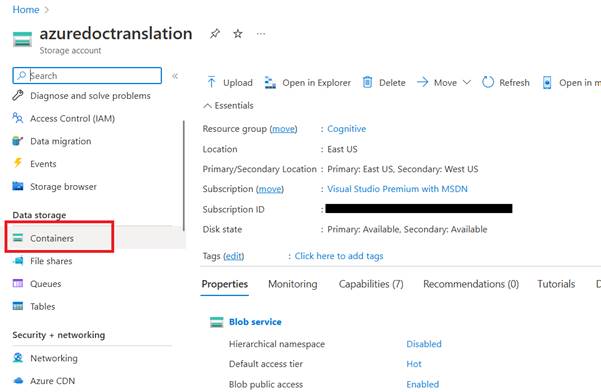
Step 1:
Under the newly created storage account, click on
Containers.
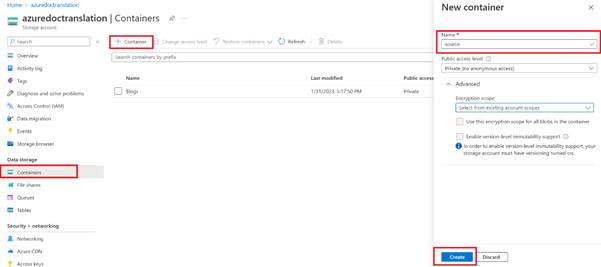
Step 2:
Click on
“+ Container”
as shown in the below image.
Add the name as
source
and then click on
Create.
Note: The name of the must be “source” as shown in the image.
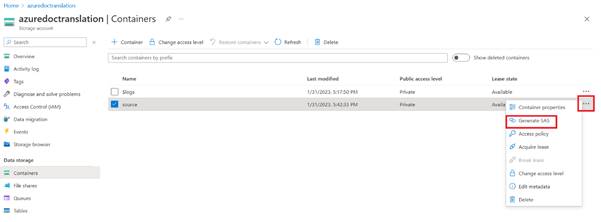
Step 3:
When the source
container
is created, then click on the option menu by selecting the container.
Then click on
Generate SAS.
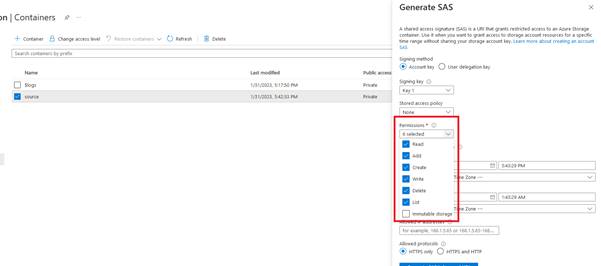
Step 4:
A pane will open, please change the
Permissions
values, and select the required values as shown in the below image.
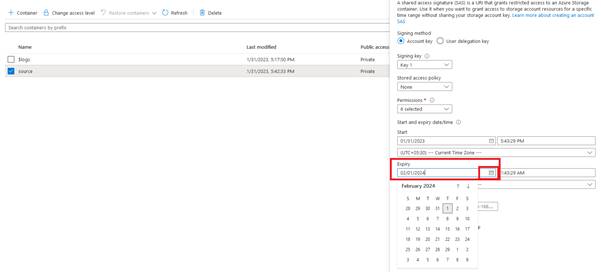
Step 5:
Change the
Expiry
date value as per your requirement.
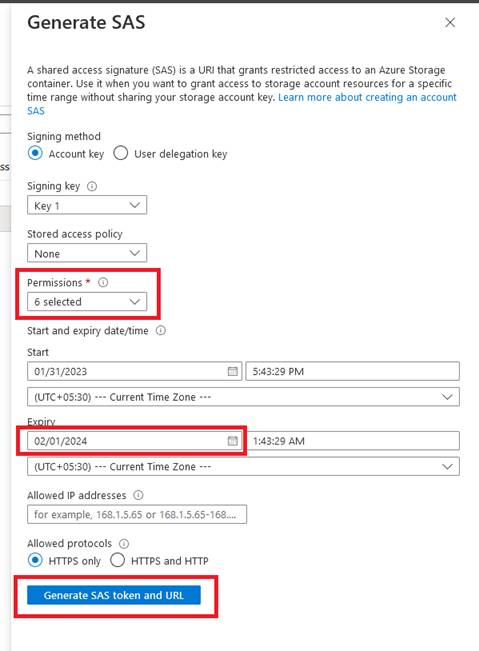
Step 6:
After changing all the required values like
Permissions
and
Expiry,
click on
Generate SAS token and URL.
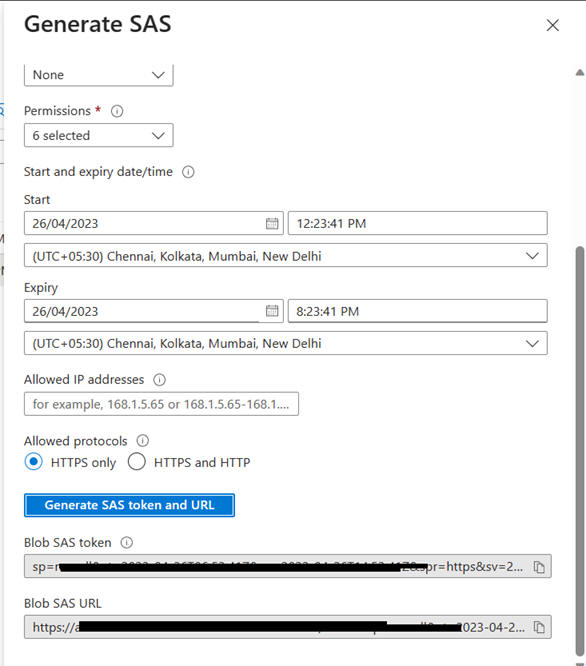
Step 7:
After the values are generated
,
copy the
Blob SAS token
value and save it.
Note:
The
source Blob token
value is same as the value of
"source" Container SAS token.
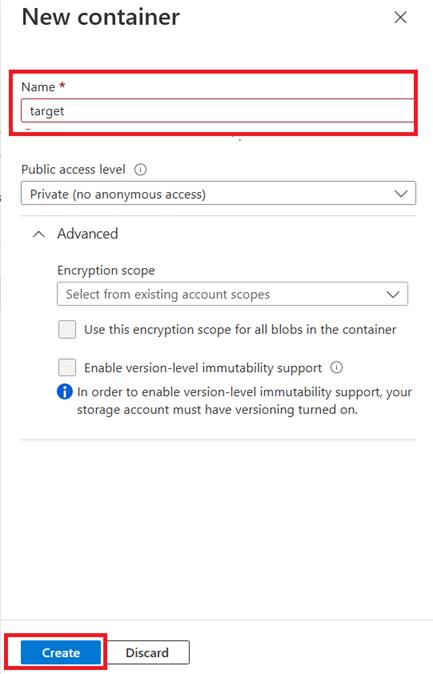
C) Create target Container and generate SAS token:
Like
step B, source
container we need to create another container named
target.
Step 1:
Click on add
Container.
Put the Name as
target.
Click on
Create.
Note:
This container name must be
target
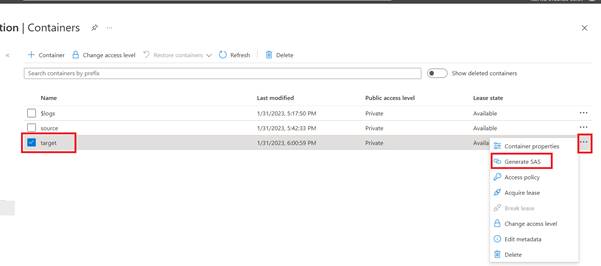
Step 2:
After creating the
target container
click on the option menu and then click on the
Generate SAS.
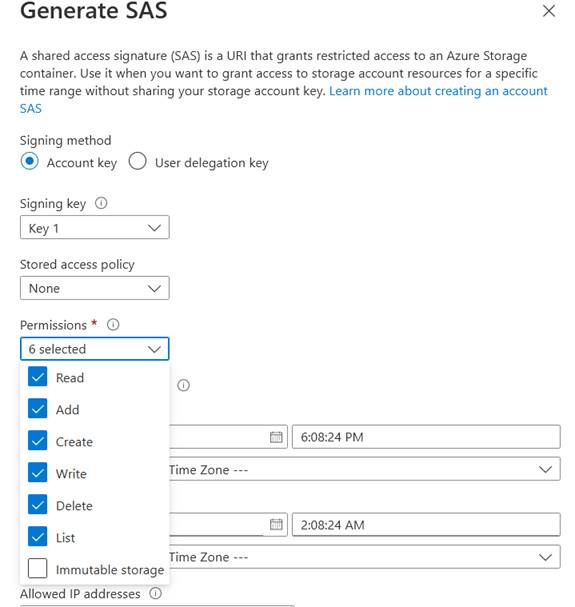
Step 3:
A pane will open, please change the
Permissions
values, and select the required values as shown in the below image.
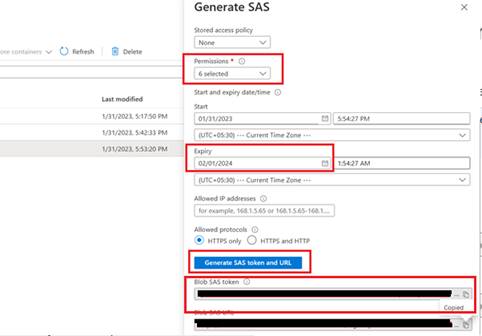
Step 4:
Change the
Expiry
date value. After changing all the required values like Permissions and
Expiry, click on
Generate SAS token and URL
After the values are generated, copy the Blob SAS token value, and save
it.
Note: The
target
Blob SAS token
value is same as the value of
"target" Container SAS token.
D)
Get the Azure Storage Blob Service endpoint:
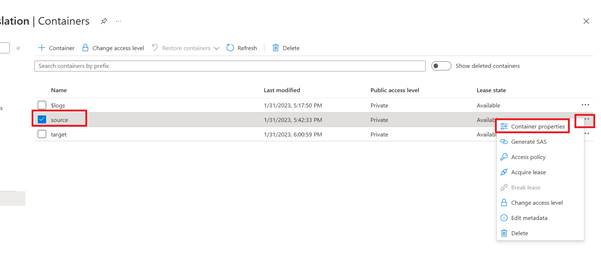
Step 1:
Click on the option menu of any one of containers and then click on
Container properties
as shown in the below image.
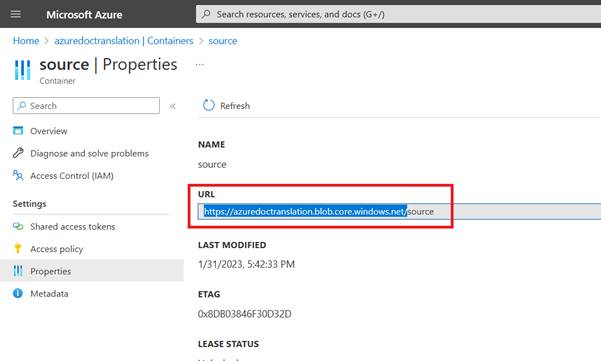
Step 2:
Copy
the
URL
value up to the
/,
refer the below image for more details. Here we have copied the below
value for
Azure Storage Blob Service endpoint.
“https://azuredoctranslation.blob.core.windows.net/”
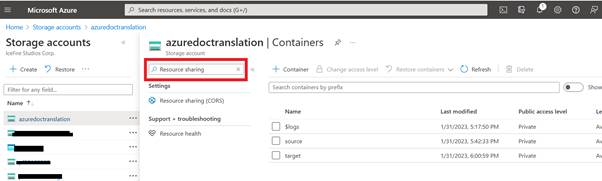
E) Add required values in the Resource sharing (CORS)
Step 1:
Under the storage account search for
“Resource sharing (CORS)”.
Then
click on the
Resource sharing (CORS)
option.
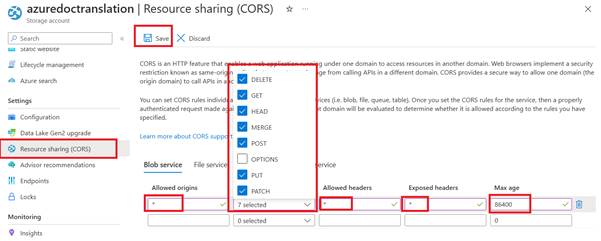
Step 2:
In the boxes enter the required values as below and then click on
Save.
For more details refer the below image.
Allowed origins
value is
*
In
Allowed methods,
select all the options except
“OPTIONS”.
Allowed headers
value is
*
Exposed headers
value is
*
Max age
value is
86400
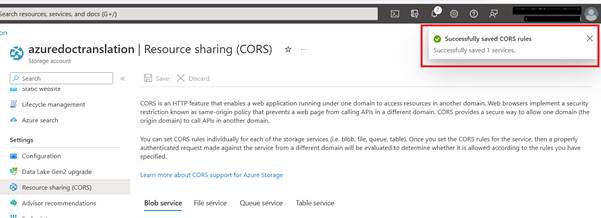
Step 3:
After
successful saving the values you will get a success message as shown in
the image.
F)
Get the value of Azure Translator key and Azure Translator Document
Translation endpoint.
Note:
You need to create the Azure Document Translator resource for
obtaining these values.
Note:
To create the resource, please refer to the section “Obtaining Azure
Translator Keys” in the “PFTQuickInstallationGuide.pdf”
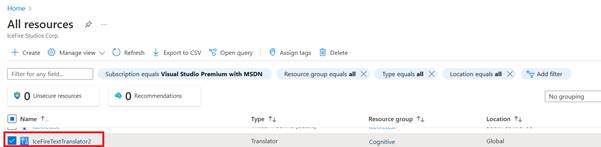
Step 1:
In the Azure portal, go to
All resources.
Step 2:
Click on the
Translator resource
you have
created before.
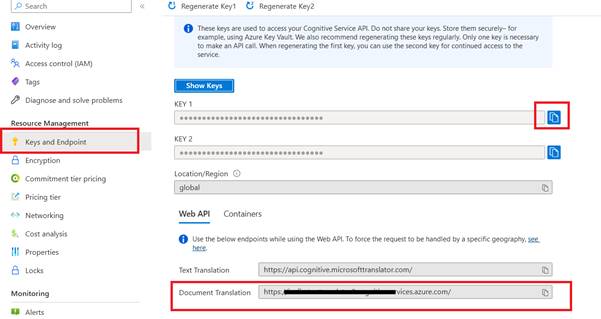
Step 3:
Then click on the
Keys and Endpoint.
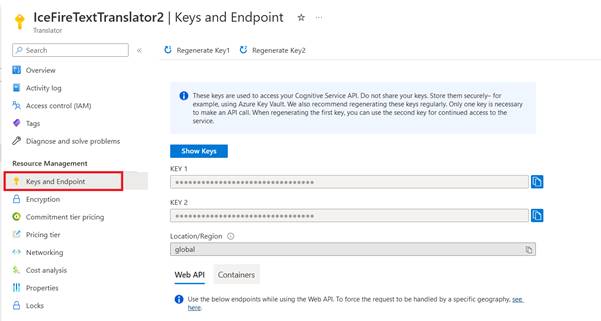
Step 4:
Copy the value of any one of the
KEY
values.
Also copy the value of
Document Translation
Note
: The value of the key will be the
Azure Translator key
value
and the value of
Document Translation
value will be the
Azure Translator Document Translation endpoint
value.
G) Configure setting in the PointFire Translator add-in page.
After installing the app to the site, go to the default app page, which
should be called "PointFire Translator Add in" in the navigation.
Select "this page" link to navigate to your site’s language setting and
add the languages that you want.

In the app page, you can see two options “PointFire Translator Server
configuration settings” and “Azure Document Translator
configuration settings”. You need to first configure the “Azure
Document Translator configuration settings”.
Enter the values of all the
parameters and then save the settings.
Enter the values of all the parameters and then save the
settings.
